Why Audio Quality Matters
Have you ever tuned in for an event where the speaker sounds fuzzy, has a distracting echo, or you can barely hear them?
Then you know how these audio issues take away from the message.
Audio quality can make or break your live event. In many ways, audio quality is even more important than your video quality. Because clear audio helps your audience understand your message and enjoy your show--even if the video isn’t perfectly clear.
A study by University of Southern California and the Australian National University found that when video is difficult to hear, the audience reports thinking that “the talk was worse, the speaker less intelligent and less likeable and the research less important.”
Considering that low quality audio isn’t only distracting for your audience, but can prevent them from fully appreciating the quality your message, it’s important to do what you can to improve your audio quality
In this article, you’ll learn a few tips to improve your audio and start sharing your message more clearly, so your audience hears more of what you have to say.
How to Improve Your Audio Quality
Microphone
For best results, use an external microphone, not the microphone built into your device.
Here’s some tips on choosing a microphone:
Decide how much you’re willing to spend before you start looking. You can find a mic that fits your needs and your budget.
When choosing between a USB or XLR microphone, remember that a USB mic is a good choice for beginners since it plugs into your computer directly, and an XLR mic requires more setup but gives the best sound quality for more advanced users.
Think about your recording space—if you expect a lot of background noise, choose a mic that isolates your voice.
Headphones
Wearing headphones reduces the amount of noise that your microphone picks up from your device.
When you wear headphones, they stop the echo that can be caused by the speakers on your computer feeding back into the mic.
If you have any guests coming up on screen, make sure they know to wear headphones too!
Check Your Settings
Once you have your mic and headphones set, be sure to check your audio settings inside of your event to make sure that you have the correct devices selected.
Crowdcast processes the audio for your events automatically. That means we help you handle things like echo cancellation, gain levels, and noise suppression.
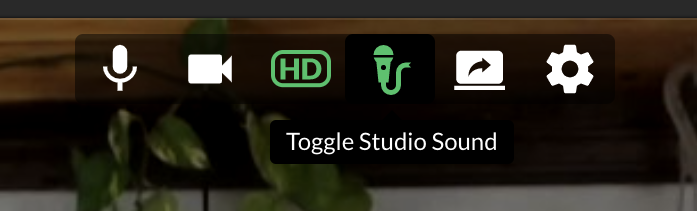
Crowdcast also has an option for Studio Sound, allowing you to stream high quality stereo audio from your computer's microphone or an external microphone.
Studio Sound is perfect for cases when you want to have unprocessed stereo audio:
- from an instrument or vocalist
- music from an external speaker
- podcast hosts who want the highest quality sound
Check all of your settings with plenty of time before your event goes live
Location
Although you may not have as much control over where you’re recording from, here’s a few tips to help you make the most of any location.
When considering any recording location, the most important thing to remember is to try to find a quiet space.
There are some simple ways to improve the acoustics in your space, like soft furniture, thick rugs, and acoustic foam panels which can help to dampen ambient noise.
And since some level of background noise might be impossible to avoid, you can try using an app like Krisp, which helps to reduce background noise from your calls.
If you're using an external microphone, make sure you’re positioned about six inches away from it. But if you are still using the mic built into your computer, make sure that you’re not further than two feet away from it, and speak directly towards it.
Testing
Once you have your equipment set up, you want to test everything with plenty of time before your event. Record yourself and listen to how it sounds to make sure that all of your equipment is working and sounding good.
Something that can be easy to overlook is your volume level. If your volume is too loud, it can cause clipping or distortion, and if it’s too quiet, it can be hard to hear at normal device volume levels. If you use a mic with a monitor, you’ll be able to hear how you sound. Another option is to use an audio interface with a monitor output.
And before you go live on Crowdcast, you can enter the green room to double check your audio & video settings… and your hair.
Quality Audio is an Investment in Your Events
When you’re sharing your message with your audience, you want to make sure they can hear you clearly.
Taking the time to make sure your audio is set up for success will improve your attendees experience and help them enjoy your events.
When you have clear audio, it also allows you to take that content you create in your events and repurpose it in audio-only form, like for podcasts. So you can extend your reach even more.
So make sure you’ve got your equipment ready, your settings checked, your location prepared, and your testing done—and you’ll be ready to host an event that sounds great.
Ready to start reaching your community with live video events? Click here to start your free 14-day Crowdcast trial today!
Sai
Founder & CEO — Building spaces for community.